More Adventures In Paper Crafts & How To Make Colored Wood Powder For Scenery
I have some old free files of scenery as well. I decided to start with a small file of an obelisk, well spring fountain, sword in a stone, sundial, fence and archery target. I was able to relocate the old file online as well and it can be found here: http://mmiparchive.papermakeit.com/24-3up.html
Note there are no instructions with these so you should think before you glue and learn from my mistakes.
Using matte photo paper or good card stock is the preferred method whereas I am printing the images out on regular paper than using a glue stick to glue the paper onto old greeting cards or other junk card material (soda boxes, junk adds, card type coupons and so on) from around the house. This recycling means my results are probably a bit more variable.
Use an Exacto Knife to carefully score along all bend points and cut in difficult places. Make sure you got a device to help roll and flatten parts together if needed. A couple different tip sized black markers. Some sort of cutting board craft or other wise. You will need scissors and glue.
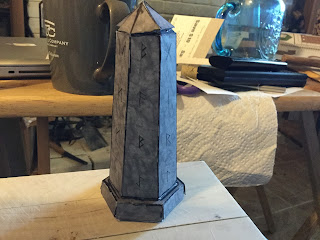
I botched the obelisk pretty badly. My first mistake was using the wrong glue to glue the paper covered card tabs of the design together with... Do Not Use the glue stick for this... use Super Glue. My second mistake was putting it together a bit wrong, I suggest the top first not last. I also suggest blackening the tabs before gluing them down.
Like anything artsy crafty some skills are needed or need to be developed, so expect problems, don't worry if it's not perfect mine sure are not. Do not be discouraged because in my experience of doing art mistakes happen all the time but can often be opportunities in disguise. The trick is to try and problem solve. In addition you can always print out a new sheet of the pattern and try again. I decided as I have limited junk card stock type stuff around to salvage my obelisk rather than try again... so I tried different fixes.
First realizing my glue mistake I did my best to get super glue into the areas it was not holding together well with doing least damage posable to the model. Next I tried inking in white showing card with black pen but as it was after the fact and parts were not going together well it did not work as good as I hoped. I then decided the only way to make the model look good was to put something on it that could look like moss. Normally people pick some sort of fake scenery powder stuff for that. I simply did not have that. I did however remember I had some old little bags of variously colored powder wood shavings of pine or cedar in a closet. I then used layers of super glue sprinkled with the powder to create the moss effect and hide my mistakes. Another option would have been figuring out a way to make vines. I am certain I will botch something else in the future if vines seem like a fix I will see what I can create from junk around the house.
Note good lighting, glasses if you need them, or a magnifying lenses are all helpful.
The other things that printed out with the obelisk I put together as well. If you make the target it is important to cut slots on the target piece where you want the three arrows and glue them in before putting the target round together... I realized I should have done that too late and it was difficult to cut after the fact and then I could not use the tabs fully to glue the arrows in. I fixed it but I definitely did a step in the wrong order.
The Sundial is cool in that it is two sundials, one working and one broken, you just flip it.
The fence is completely a different scale. I put one of the paper fairies and an old lead figurine in the next shot to give scale to the scenery.
Making powdered scenery stuff of your own is easy.
Powdered Scenery Stuff
Get a bag of pine shavings or cedar shavings. (Pet Supply or Feed Stores carry them for animal cages)
Put a handful or so into water dyed with regular old food coloring in the shade/color you want. Let these soak at over night.
Drain and spread out on cookie sheets. You might want to pat the shavings with paper towels. Set cookie sheets in the sun, or bake on low in oven. If you have a food dehydrator you could use that as well.
Once the shavings are dried now powder them in an old coffee grinder. Store in jars or zip lock baggies. Thus you can make any colored powder you want as much as you need and it is non toxic too.
Note there are no instructions with these so you should think before you glue and learn from my mistakes.
Using matte photo paper or good card stock is the preferred method whereas I am printing the images out on regular paper than using a glue stick to glue the paper onto old greeting cards or other junk card material (soda boxes, junk adds, card type coupons and so on) from around the house. This recycling means my results are probably a bit more variable.
Use an Exacto Knife to carefully score along all bend points and cut in difficult places. Make sure you got a device to help roll and flatten parts together if needed. A couple different tip sized black markers. Some sort of cutting board craft or other wise. You will need scissors and glue.
I botched the obelisk pretty badly. My first mistake was using the wrong glue to glue the paper covered card tabs of the design together with... Do Not Use the glue stick for this... use Super Glue. My second mistake was putting it together a bit wrong, I suggest the top first not last. I also suggest blackening the tabs before gluing them down.
Like anything artsy crafty some skills are needed or need to be developed, so expect problems, don't worry if it's not perfect mine sure are not. Do not be discouraged because in my experience of doing art mistakes happen all the time but can often be opportunities in disguise. The trick is to try and problem solve. In addition you can always print out a new sheet of the pattern and try again. I decided as I have limited junk card stock type stuff around to salvage my obelisk rather than try again... so I tried different fixes.
First realizing my glue mistake I did my best to get super glue into the areas it was not holding together well with doing least damage posable to the model. Next I tried inking in white showing card with black pen but as it was after the fact and parts were not going together well it did not work as good as I hoped. I then decided the only way to make the model look good was to put something on it that could look like moss. Normally people pick some sort of fake scenery powder stuff for that. I simply did not have that. I did however remember I had some old little bags of variously colored powder wood shavings of pine or cedar in a closet. I then used layers of super glue sprinkled with the powder to create the moss effect and hide my mistakes. Another option would have been figuring out a way to make vines. I am certain I will botch something else in the future if vines seem like a fix I will see what I can create from junk around the house.
The other things that printed out with the obelisk I put together as well. If you make the target it is important to cut slots on the target piece where you want the three arrows and glue them in before putting the target round together... I realized I should have done that too late and it was difficult to cut after the fact and then I could not use the tabs fully to glue the arrows in. I fixed it but I definitely did a step in the wrong order.
The Sundial is cool in that it is two sundials, one working and one broken, you just flip it.
The fence is completely a different scale. I put one of the paper fairies and an old lead figurine in the next shot to give scale to the scenery.
Making powdered scenery stuff of your own is easy.
Powdered Scenery Stuff
Get a bag of pine shavings or cedar shavings. (Pet Supply or Feed Stores carry them for animal cages)
Put a handful or so into water dyed with regular old food coloring in the shade/color you want. Let these soak at over night.
Drain and spread out on cookie sheets. You might want to pat the shavings with paper towels. Set cookie sheets in the sun, or bake on low in oven. If you have a food dehydrator you could use that as well.
Once the shavings are dried now powder them in an old coffee grinder. Store in jars or zip lock baggies. Thus you can make any colored powder you want as much as you need and it is non toxic too.


Comments
Post a Comment